PhotobucketPhotobucket Photobucket

Thursday, January 12, 2012

Mexican done different!

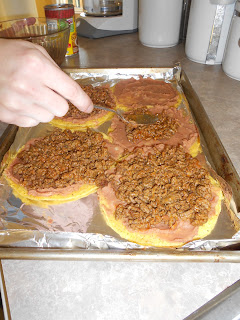
My family LOVES Mexican....from the refried beans to lettuce on top!  One day, as I was shopping for my normal taco shells, I came upon Tostada shells!  These are basically hard, flat, corn tortillas.  And, as the picture on the front suggests, I decided to build my own Mexican pizza!

Here is all you need:

 Box of Tostada shells
1lb of cooked ground sirloin/chicken flavored with taco seasoning
refried beans
tomato
lettuce
cheese
{Of course, add or subtract any ingredients to personalize this Mexican pizza to your taste buds!}


Now to begin....
I start with the shell and cover it with a spoon full of refried beans {YUM!}
(just as you would spread pizza sauce on a pizza!)


Add another spoon full of your taco meat of choice
{These would also make a great vegetarian dish...just skip the meat!}


Top with some cheese and place it in the over on 350 for about 5 minutes.
Just long enough to warm the toppings and melt the cheese.


Once you take it out, add the {accessories} as I call them...
tomatoes, lettuce, more cheese, onions, sour cream, whatever else you enjoy on your normal taco!


Top it off with a little taco sauce and {VIOLA!}


Even my 4 year old LOVES it...of course who wouldn't if it has PIZZA in the name!
{ENJOY!}


Wednesday, January 11, 2012

Organization is key!

I scored this wonderful idea on pinterest a few months ago and before I had a chance to recreate it, one of my work buddies did, Amy, and she kept telling me how CUTE it turned out! So, after saving a few empty boxes of diapers and grabbing a few yards of burlap from Walmart, I began! I had originally intended on using the boxes in Lucy's room for her shoes and hair bows, etc.  But, while working on the boxes in the living room, I found an area of greater need.....the dvd storage area... {GASP} Warning: What you are about to see is no joke.  I may appear put together, but there are some areas of my house/life that are pure chaos...And believe me, the only reason I am showing you this, is because I am SO pleased with how it turned out in the end =)

{GASP!}
 ---{ What you need }---
Empty boxes - [diaper boxes work the best]
Hot glue gun
1 yard of Burlap per box 
Thick ribbon of any color

Lay the box out in the middle of your yard of burlap. Start with one side of the box and fold the Burlap over after applying hot glue to the inside of the box.  Rub your hand over the burlap to press it evenly into the hot glue.  {NOTE: if you have baby smooth/sensitive hands, use something else to press the burlap into the hot glue.  It didn't bother my hands at all}

{My cute little helper}

Glue each side separately and pull the sides tight before pressing them against the hot glue.
Repeat with as many boxes as you have or need!

And before you know it, {VIOLA!}


I added ribbon and LOVED it even more, unfortunatly, I ran out after the first one, so off to the store I go!

{Word to the wise...paint the end of your boxes with black or white paint prior to wrapping them!  I did not do this and although mine was a faster process, you can just barely see the Diaper print under the burlap.  The pictures make it much more obvious than it really is, and once you add the bow, it will cover it even more.  BUT, to avoid this, just take a few extra minutes and paint them :)}

Love, love, love me some organization!!

Wednesday, December 28, 2011

Mary and her Merry Christmas

This year I had the honor of singing at my church on Christmas morning.  {Side note- I *LOVE* to sing, but I *very much dislike* singing in-front of others.}  The song that I chose to sing was new to me, I had never heard it before this Christmas season.  The moment that it came on the radio, without even hearing a word, just the music, I already felt the {Holy Spirit} filling me up. (If you've never felt the Holy Spirit's presence, I encourage you to pray right now and ask God to bless you with His nearness.  There is NOTHING on this earth that compares.  Nothing.) 

The name of the song is 'Your Here', originally recorded by Francesca Batestelli.  As you begin listening to the song, you quickly realize that it is sung from the perspective of Mary, Jesus' mother.  I'm not sure if this song touched me so deeply because I currently have my own little baby in the home {Lucy Pea}, or if it was just God's touch.  But, for the 3 or 4 minutes that the song lasts, all I can think about is what it must have been like to hold baby Jesus in my arms.  The feeling I get when I have Lucy all snuggled in my arms is indescribable, so just imagine what holding Jesus had to feel like!  Whoa!

Every year we take extra special care to remember and remind ourselves and our kids why exactly we celebrate the special day.  This year, because of this song, it was extra special to me.  God, who created us, loved us enough to send His Son.  Even after we continue to screw up, time and time again.  Whoa, again! 

I hope during the craziness of the season, you were able to take a few moments to reflect on why we celebrate the very special day of Christmas.  If not, it's never too late...watch the video that played while I sang at church and listen to the special message that Francesca so graciously brought to us through this beautiful song.  And I hope and pray that you had a very Merry Christmas!


Sunday, December 18, 2011

T-shirt scarf = too cute!

When I saw this scarf on Pinterest, I knew that I had to recreate it!  I love scarves, but they can be costly and this frugal momma is not about to drop my hard earned dollars on a scarf unless I have a coupon AND it's on sale!  So to my delight, I watched tutorials and scrolled lots of pages before I decided that I could tackle it and after tweeking it a bit, this is how I did it...

First I found 2 T-shirts in my husbands closet Size Lg.  {You can do this with 1 XL or 2XL shirt, but the more material you have the nicer the scarf looks!}

Grab a plate from your kitchen and a pencil and start [lightly] tracing circles onto your shirt.  **Try to find T-shirts that are plain**  If you use a shirt with some design, just avoid that area of the shirt when cutting out the circles.

Once all of your circles are cut out,  (hopefully you have atleast 8, I reccomend no less.  Remember the more, the better) start cutting your cirlces into a spiral pattern. 


Place all of the spiral t-shirt cut-outs together and find the middle of the fabric and {using a 3 inch piece of the t-shirt fabric} tie them all together!


And this took me all of 20 minutes and was FREE.  Yep, stole a few shirts from my husbands closet and Voila!  It takes an ordinary outfit and fancies it up a bit!  Who knew a plain old t-shirt could be SO stinking cute!


Now.....off to find more t-shirts!

Saturday, December 10, 2011

Snack time!

Yesterday I was surfing the internet when I ran into a yummo looking snack that, for all intensive purposes, I will call healthy!  After all, it involves a banana {fruit!}, peanut butter {protein!}, and chocolate {just pure love!}.   And that is it.  Just those three ingredients and my family LOVED them!!

 Easy peasy!  Try it out!
Gather your bananas, chocolate, and peanut butter...


Slice the bananas and add a small {blop} of peanut butter atop them.


Place them in the freezer no longer than 15 or twenty minutes. 
Melt your chocolate in the microwave or using a double broiler on the stove stop so that you avoid burning your chocolate.  You will know if you ruined your chocolate if there are lumps that will not melt. {As I have burned chocolate many times}  I recommend stirring atleast every 15 seconds.


Remove from the freezer and dip them in and viola! I like the bananas softer, so I will store them in the fridge, but if you like the cold, frozen banana better, they can be stored in the freezer.


They were SO yummy!  I say "were" because they did not last long!  Between my husband, myself, and my 4 year old son, we were popping them in like they were m&m's. And like I said, you could SO get away with calling them healthy!

Enjoy!


Wednesday, December 7, 2011

Family pictures

Christmas is literally right around the corner!  And you know what that means....time for Christmas pictures/cards.  Our photographer, Kristan McIntosh of GKB Photography is incredible. I love, love, love, love her. Family pictures {to a mom}mean picking out outfits that aren't too matchy-matchy, figuring out where to have them taken and who will take them {easy for me, I'm never letting this lady go}!  This was also the first time I would be wearing skinny jeans and boots in public....I was terrified!  But, Kristan assured me that she would crop some sexy legs in for me if need be....<3 her.  Sheesh, sometimes I wish I was a kid again and could just show up and smile!

 Well, our picture day came and with it, so did the rain.  Blah.  That is not a good sign for hair, dangit, not to mention the more important fact that I didn't want our children in the freezing cold rain.  We rescheduled for a week later because we weren't sure where to go and wouldn't you know a week later it was STILL raining!  (Shouldn't we be having snow now?!)  Kristan assured me that she could pull it off, so even though I was bummed about the weather, when I got the pictures back, I couldn't have been more pleased!

Every time I look at the pictures that she has captured for us over the past year, I squeal with delight! So without further ado, here are my favorites...


I'm supposed to pick one for a Christmas card, but how the heck am I to do that??  I think this years card may just be a collage :)  Happy Christmas Pictures to all of you out there who have yet to do it!

Wednesday, November 23, 2011

The secret to life.......and a happy Thanksgiving!

The other day I asked Noah if he knew why we celebrated Thanksgiving and without hesitation he said “Because it’s Jesus’ birthday!” Fail.  Oh well, at least His birthday is coming up soon, right?!  After explaining to/reminding him that Christmas was Jesus’ birthday, we got back on track and started talking Thanksgiving again.  I explained to him that it is a day where we look at everything around us and thank God for it.  He thought that was cool, and within seconds he was already spouting that he was thankful for power ranger swords, his sister, and his portable DVD player. 

But, as I was driving in to work yesterday, I heard someone mention the word ‘content’ on the radio. And it reminded me that we must be content in order to be thankful.  The world around us is anything BUT content.  Everyone is always chomping at the bit for the next coolest, bigger, fastest SOMETHING! Fill in the blank…I really need __________.  But do we really need anything else??  Why can’t we just be content with what we have in the here and now?

My cordless phone has tape on the back of it to hold the battery in and the numbers are getting difficult to push, but do I need to toss it out get a new one….  My shoes are not ‘in’ right now, but are perfectly comfy, keep my feet warm and dry, do I need new ones…  My car has 80,000 miles on it and has seen better days, shall I trade it in for newer one…  You get my point.  We, as a society, are constantly looking to upgrade because what we have right now, although it is meeting our needs, could be better. 

After spending countless hours with my grandmother over my last maternity leave, she taught me the secret to life is being content.  Not only is my grandmother a genius, but I found proof in the Good Book to back it up in Philippians 4:11-13, Philippians 4:11-13  11 Not that I was ever in need, for I have learned how to be content with whatever I have. 12 I know how to live on almost nothing or with everything. I have learned the secret of living in every situation, whether it is with a full stomach or empty, with plenty or little. 13 For I can do everything through Christ,[a] who gives me strength.

This Thanksgiving, take some time to look around and not only be thankful for what you have but be content.  God has blessed us all tremendously!